Плагины для sketchup при проектировании дома: понятие и виды- инструкции +видео и фото
Содержание:
- Exploring the Model Info dialog box
- Первый запуск Скетчап
- What you need to know about components
- Managing trust and signatures
- Understanding how SketchUp for Web features work differently from the desktop version of SketchUp
- Plugin: Component Sprayer Update 1.3
- Uninstalling or removing extensions
- Creating a template
- Stretching or squishing geometry to scale
- Managing trust and signatures
- Understanding what you need
- Пропорциональное масштабирование выборки
- В заключении
- Особенности
- Scaling your entire model
- Learning how to use SketchUp tools
- LayOut
Exploring the Model Info dialog box
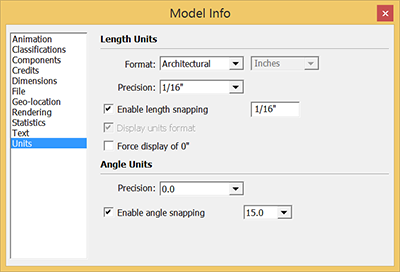
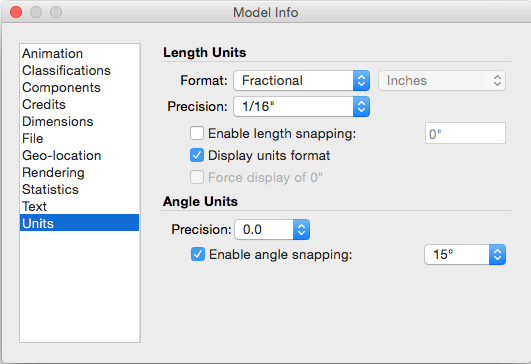
The Model Info dialog box is where you apply settings for your entire model, so it makes sense that templates reflect all the settings you make here. To open the Model Info dialog box, shown in the following figure, select Window > Model Info. To access the different types of settings, select an option from the sidebar on the left.
The following list introduces each of the options in the sidebar:
- Animation: If you animate scenes, as explained in Communicating Your Designs, the settings here set the timing for the transitions and delay between scenes.
- Classifications: If you use BIM (building information modeling) and classification data, as explained in Classifying Objects, you can import classification systems via this panel.
- Components: Set preferences for how components and groups appear when you’re editing inside the component or group context. You can also toggle the visibility of component axes. See Grouping Geometry and Developing Components and Dynamic Components for details.
- Credits: You can view who created a model or click Claim Credit to add the name of the SketchUp license owner to the model. If your model contains components, see who created the components, too. This feature is handy if you’re collaborating with a team to create a model, or if you upload or download models and components via the 3D Warehouse.
- Dimensions: Set the defaults for dimension text. See Adding Text to a Model.
- File: See basic data about the model file.
- Geo-location: Check whether your model is geolocated. If not, you can add a location via Google. SketchUp Pro users can also enter geographic coordinates manually. See Modeling Terrain and Other Rounded Shapes for an introduction to geolocated models.
- Rendering: You find a setting here for anti-aliased textures, which improves performance. See Improving Performance for more about customizing SketchUp to manage performance issues.
- Statistics: This pane keeps track of all the entities your model contains. You find tools for purging unused entities and fixing problems, too.
- Text: Set defaults for screen text and leader text, as explained in Adding Text to a Model.
- Units: Choose the default unit of measurement for your model. Start with the options in the Format drop-down list: Architectural, Decimal, Engineering, or Fractional. If you choose Decimal, you can also choose whether your model uses inches, feet, millimeters, centimeters, or meters as the default unit.
- Model Info window
- SketchUp Preferences dialog box
- Text tool
Первый запуск Скетчап
Поставляется приложение Гугл Скетчап на русском, поэтому русификатор скачивать не придется. На данном этапе нас интересует сам редактор, то есть приложение SketchUp Pro, а не два других его компонента. Поэтому запускать нужно именно его.
При первом запуске появится окно приветствия с тремя основными вкладками:
- Изучение. Для работы с онлайн сервисами для знакомства с приложением. Необходимо подключение к интернету.
- Лицензия. Здесь можно посмотреть данные о лицензии, при необходимости отредактировать или удалить эту информацию.
- Шаблон. Выбрать подходящий для моделирования шаблон. Например, для разработки предварительных проектов или городского планирования. Нужны для задания единиц измерения и вида модели. Вы всегда сможете его изменить по ходу работы. Библиотека программы включается в себя более 20 доступных для выбора шаблонов.
Определившись с начальными настройками, можно приступать к работе с программой. Для этого нажмите кнопку «Начать использование SketchUp». После этого появится окно с рабочим пространством.
Справка: чтобы отключить экран приветствия, снимите галочку напротив «Всегда показывать при запуске».
What you need to know about components
Working in context
All the tools act only on entities within the current editing context. This means that the Erase tool cannot touch anything outside the current context even if you click on something unintentionally. The Select tool will not select anything outside the context, even when using a crossing window.
The drawing window can sometimes become too crowded with information during editing. View > Component Edit > Hide Rest of Model is a toggle that shows or turns off everything outside the current context. You can also toggle the visibility of similar components while component editing View > Component Edit > Hide Similar Components. Learn to use these features to become a faster, more efficient modeler.
 Component nesting and context
Components can contain other Components and Groups in addition to faces and edges. This is called nesting. Each time a Component (or Group) is included within another Component or Group, it is nested one level within the outer context.
Context means the immediate container for entities (edges, faces, groups, components, dimensions, text, etc.). A model is the largest context that SketchUp can have;it is the uppermost level of organization. When entities are selected and included in a Component, the Component becomes the context for those entities. If a Component is made from three other Components, that Component becomes the context for those three sub-entities.
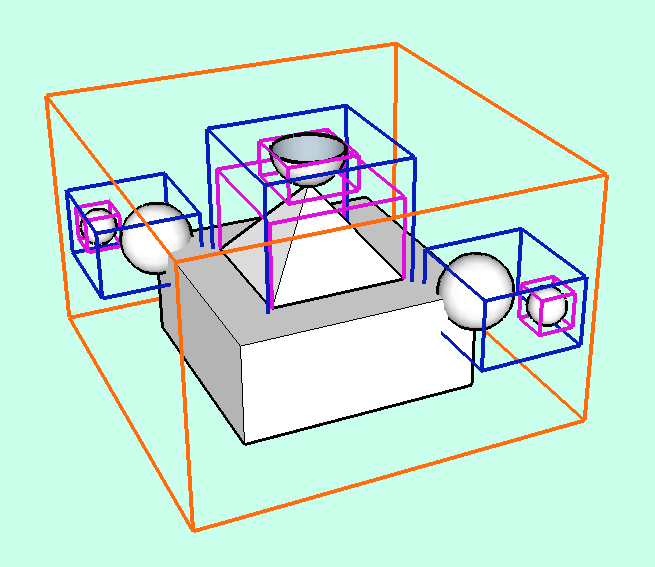
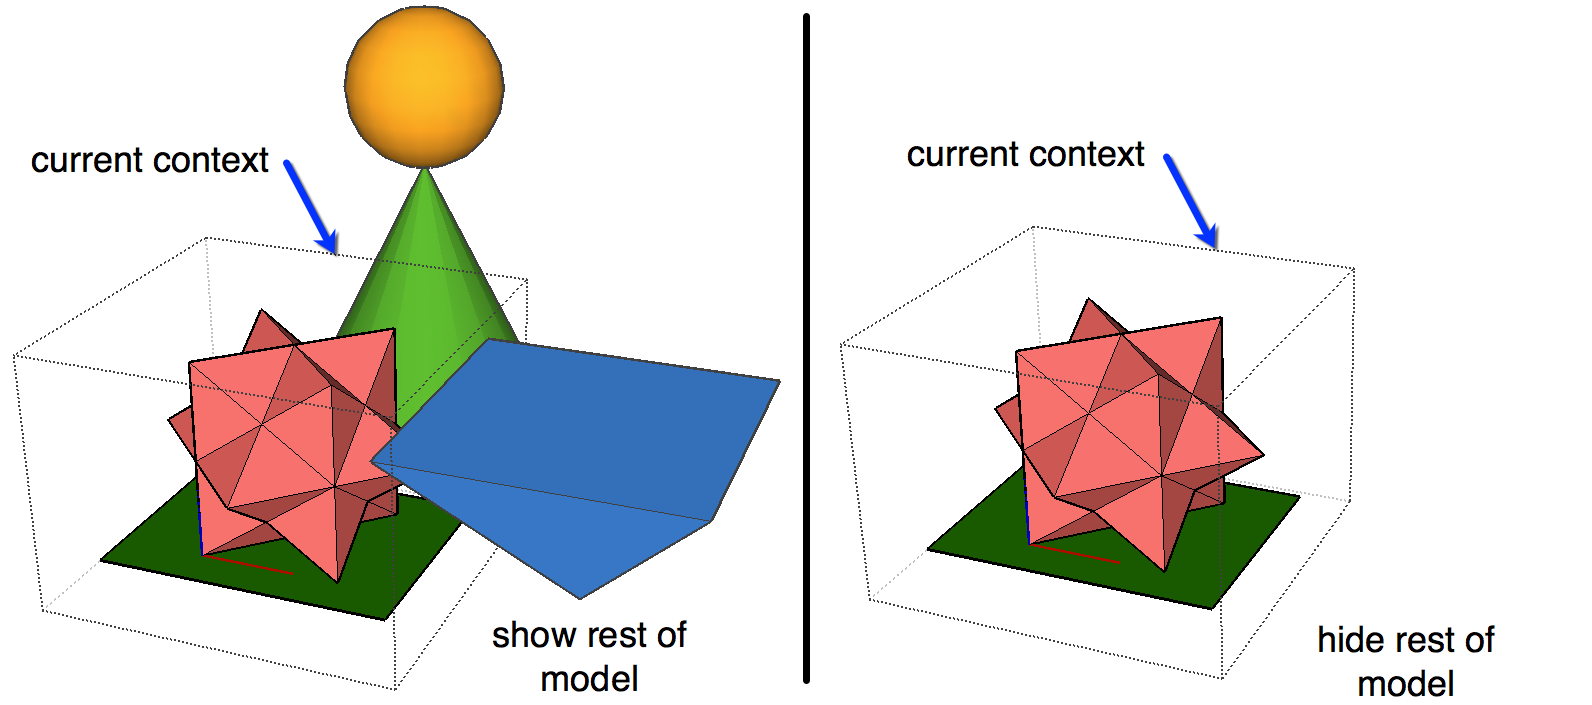
Fig. 1
In Fig. 1, the orange lines indicate the outer bounds of the main Component’s context. The blue lines indicate the first nesting level of sub-Components within the main Component. Each blue box represents the context for the items within the box. Finally the magenta lines indicate the second nesting level down of sub-Components within the first (blue) nesting level. Notice that the magenta objects are within context of each of the nested blue components.
Context editing components and nested components
Components and groups may be edited (modified) at any time by Right clicking on the object and selecting Edit from the context menu, or by double clicking the select tool on the object. To finish editing, right click in white space outside the bounding box and select Close Group or single click the select tool outside the bounding box.
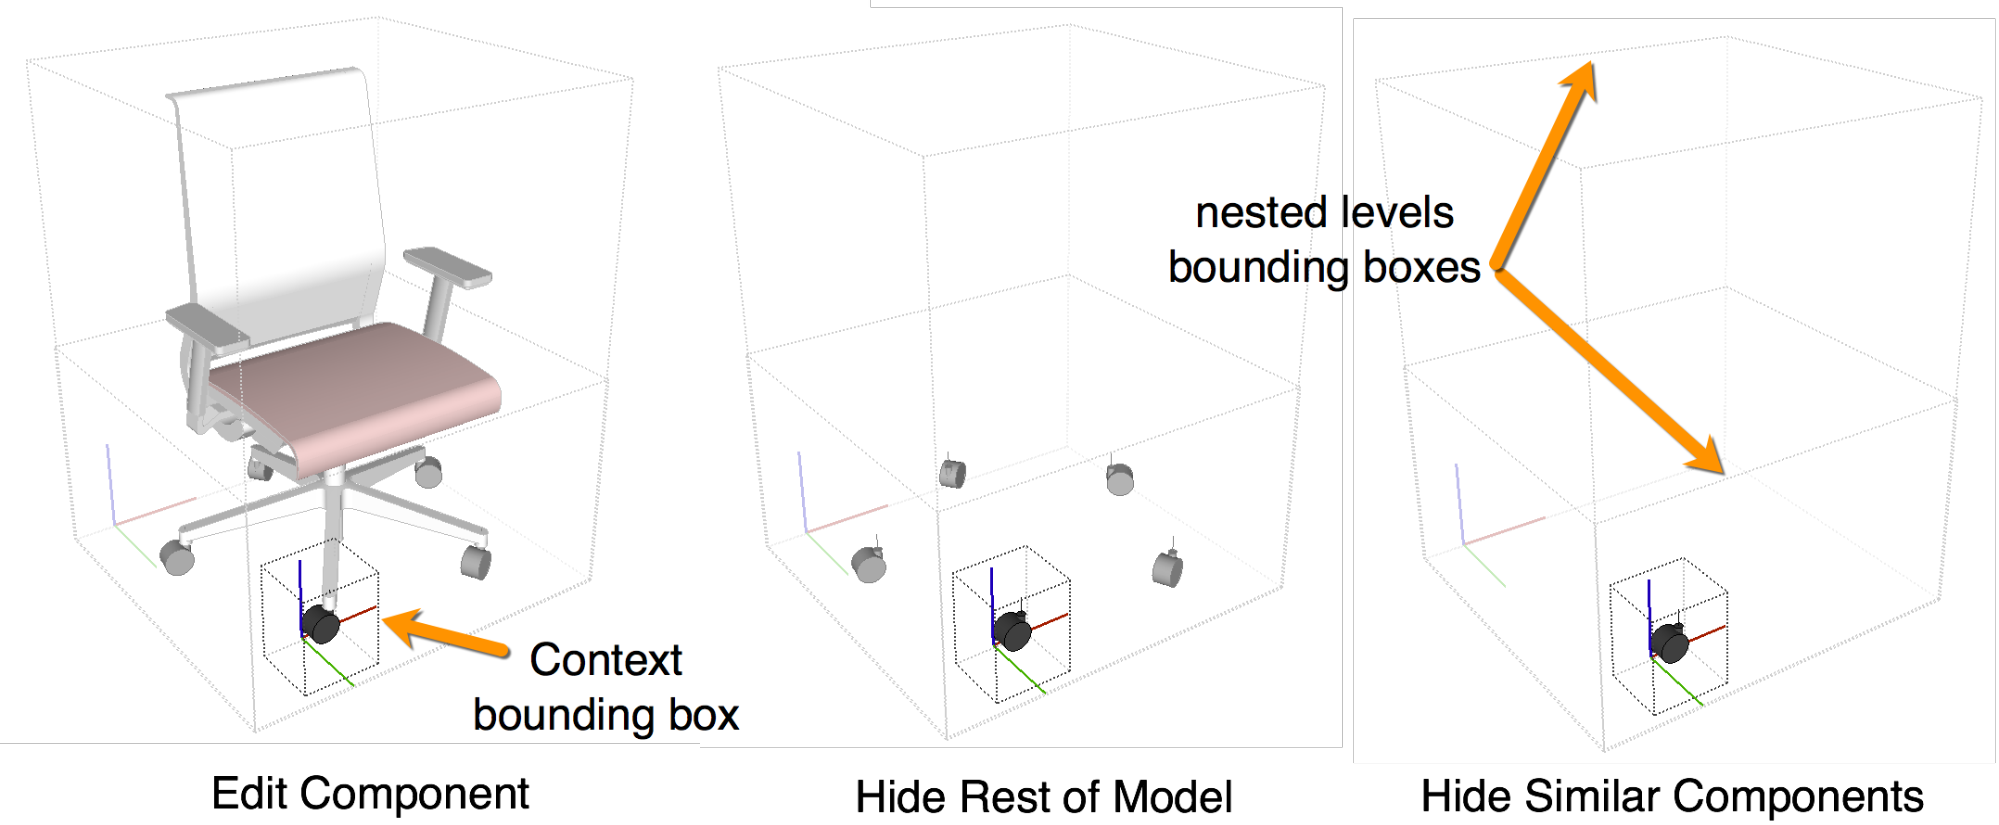
Editing a component is like working on another SketchUp model within the main model. SketchUp uses in-place component editing. This allows you to see the rest of the model in context for reference while you make changes to the component. When editing a component, the limit of the current context for the component being edited is shown by a gray bounding box. The axes directions and origin for the component are shown with a red, green, blue icon. When editing a component, the rest of the model is low lighted (dimmed). You cannot change any of the rest of the model outside of the current context, but you can infer to anything throughout the entire model.
Complexity / Level of detail in a model
Level of detail (LOD, or Complexity of detail) has important implications for a product manufacturer. Complexity refers to the materials, nesting levels, and number of polygons used to represent geometry. See the article: Making a detailed model in a lightweight way.
Many products are modeled using engineering CAD programs to allow the models to drive the manufacturing process and machinery. To do this, a great deal of detail is required of the CAD models. When these types of models are brought directly into SketchUp, however, they can immediately bog down the performance of the designer’s model and therefore may not be a very useful product for the designer to integrate into their design.
 |
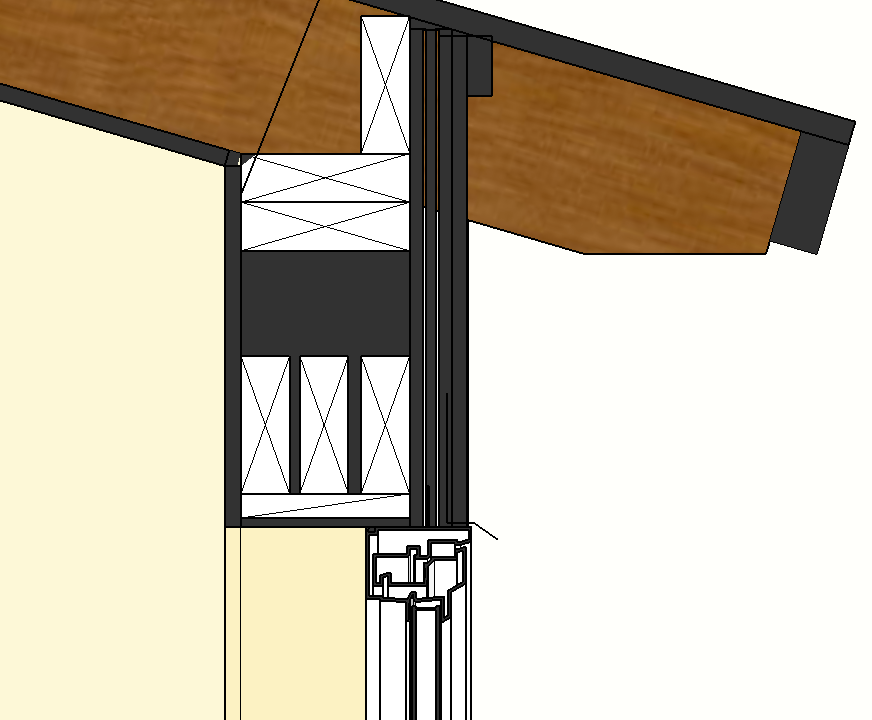 |
There may be times, however, when a designer desires a more detailed representation, especially when they are planning on using the model to create section details. This is a good opportunity for two product models of differing levels of detail to be swapped one for another using a consistent origin point.
Managing trust and signatures
Starting with SketchUp 2016, registered extension developers can claim their software by signing it digitally. This signature says, “I made this,” but in a secure coded format. In other words, when an extension is signed, the extension file contains a signature file that is securely tied to the developer’s Extension Warehouse account. An extension may be unsigned if you installed it manually.
Tip: Download the most recent version of any extension you use from the Extension Warehouse, the author, or the original trusted download source. You might contact the author of any extensions that are not digitally signed and ask them to look into this new feature.
The Extension Manager enables you to see whether an extension is signed. If you have an unsigned extension, you can tell SketchUp whether you trust the file, which determines whether the extension can be enabled at startup. Follow these steps:
- Select Extensions > Extension Manager. The Extension Manager window appears.
- In the Extension Name column, you see whether an extension is signed. Click the right-pointing arrow to see an extension’s details, and you can view the extension’s signature information and designate an unsigned signature as trusted.
Understanding how SketchUp for Web features work differently from the desktop version of SketchUp
Right now, here are a few key differences between the way SketchUp for Web and the desktop version of SketchUp work:
- Styles: SketchUp for Web includes many preset styles. However, you cannot edit styles or create your own style templates, as you can in SketchUp for Windows or Mac OS X.
- Materials: SketchUp for Web also includes many preset materials, but you can’t edit or create new materials.
- Keyboard shortcuts: SketchUp for Web shares functionality with your web browser. When familiar SketchUp keyboard shortcuts are in direct conflict with your browser, those shortcuts can’t be used. Don’t worry! We’re working on a way to customize shortcuts within SketchUp for Web. Keep your eyes open for changes.
- Extensions: Extensions are Ruby scripts that add functionality to SketchUp. In SketchUp for Web, extensions currently aren’t available. Because dynamic components also rely on Ruby, this feature isn’t currently available in SketchUp for Web either.
- High-resolution printing: You can print files or download your file in format, but you cannot yet print high-resolution images to scale via SketchUp for Web.
Almost everything about SketchUp is built into the SketchUp for Web. If your favorite feature isn’t there yet, please let us know via the SketchUp for Web (formerly my.SketchUp) user forum.
Note: LayOut and Style Builder, two separate applications that come with a SketchUp Pro license, are not on the SketchUp for Web development schedule.
- shortcuts
- shortcut
- keyboard shortcuts
- keyboard
Plugin: Component Sprayer Update 1.3
4
08
2008
 The fantastic Didier Bur (checkout his Ruby Library Depot for all his fabulous Sketchup Plugins) has announced an update to his incredibly useful, Free Sketchup Plugin, Component Sprayer.
Whats new in version 1.3
- New “shape” option to drop component at each vertex of selected faces.
- Bug fix when loading the script on Mac.
- Bux fix that froze the script when no destination layer were specified.
This Sketchup plugin is great for randomly spraying trees onto landscapes, making rows of columns, rivets, etc… or for making abstract art! Give it a try and let me know, or see how its going! 8)
Technorati Tags: , , , , , , ,
Comments : Tags: 3d design, 3d plugin, 3d rendering, free plugin, free sketchup plugin, sketchup, sketchup addon, sketchup plugin
Uninstalling or removing extensions
If you need to uninstall one or more extensions, the Extension Warehouse makes this task quick and easy:
- In SketchUp, select Extensions > Extension Warehouse and sign in to the Extension Warehouse.
- Select My Extensions from the user menu. The Extension Warehouse opens to the My Extensions tab.
-
You can uninstall all your extensions in one move by clicking Uninstall All in the top right of the My Extensions tab. Or, you might uninstall a single extension that you no longer use by clicking its Uninstall option.
Tip: When you uninstall an extension, it’s grayed out and moves to the bottom of the My Extensions tab, like the 3D Text Editor extension shown in the earlier figure. If you change your mind later, click Install to reinstall the extension. Or if you’re completely and totally done with the extension, click Remove to delete the extension from your My Extensions tab.
To uninstall an extension in the Extension Manager, follow these steps:
- Select Extensions > Extension Manager. The Extension Manager window appears.
- Click the Manage tab at the top.
- On the Home tab, click the Uninstall button next to the extension that you want to uninstall. After a few moments, your extension is removed from your copy of SketchUp. If you ever want to reinstall the extension, you can quickly access the extension on your My Extensions page in the Extension Warehouse.
Creating a template
If you’re always making the same change or set of changes when you create a new model, you can save all those changes to a new template so that you can start creating your model right away.
To create a new template, follow these steps:
- Create a new SketchUp file with your current default template.
- Make only the modifications that you want to save with the template. Templates include all the settings in the Model Info dialog box, Style settings, and Shadow settings. You can also create any base geometry. For an overview of the Model Info dialog box, see the next section.
- Select File > Save As Template.
- Navigate to the location where you want to save your template.
- Give the template a name.
- Click the Save button.
After you save the template, you need to follow the steps in the preceding section to make the modified template your default template.
Note: Technically, you can overwrite the existing template with your changes by saving the template under its installed filename in SketchUp’s installed Templates folder. However, you’ll like need to make changes in your operating system first. On Microsoft Windows, you need permission to save files to SketchUp’s Template’s folder, which you find at the following location: . On Mac OS X, you need to make your Library files visible in order to see them, and your templates are saved in this location: , where reflects your SketchUp version number.
Stretching or squishing geometry to scale
Sometimes, you need to scale only one dimension of a model (or maybe two). To do so, use the Scale tool’s edge or face grips. Here’s how the process works, using a cabinet as an example:
- With the Select tool (), select the geometry you want to scale. This step is important for a complex a 3D selection. Skip this step for an easy selection, like a 2D shape or a surface entity.
- Select the Scale tool () or press the S key. A yellow box with green grips appears around your selection. If you skipped Step 1, click the geometry with the Scale tool cursor.
- Click an edge or face grip (not a corner grip). The selected grip and the opposite scaling grip turn red, as shown in the figure, and in the Measurements box, you see a scale of 1.00, which means your geometry is at its original size, or scaled to 100%. The Measurements box also displays the axis direction for your scale, such as Blue Scale or Red Scale. If you select an edge grip, you see two axes, such as Red, Green Scale.
- Move the cursor to scale the entity. The Measurements box displays the scale dynamically. Press the Esc key at any point to start over. To set the scale from the center instead of the opposite edge or face, tap the Ctrl key (Windows) or the Option key (macOS) to toggle this functionality while you move the red corner grip.
- Click to set your selection’s new scale. Or type the desired scale dimensions, and press Enter. To set the scale on two or even three axes, type two or three numbers, each separated by a comma, such as 3,2. In this example, you see the original cabinet was scaled to be twice as wide but half the height.
Tip: If you have trouble controlling the scale direction, try repositioning the drawing axes to your selection. To do so, select Tools > Axes from the menu bar. With the Axes tool cursor, click corner you want to use to align the drawing axes. Then move the cursor so that it snaps the edge to which you want to align your inferred axis and click to confirm the change. (The inference is red, green, or blue depending on the direction you move your cursor.) See Adjusting the Drawing Axes for details about working with the drawing axes.
Managing trust and signatures
Starting with SketchUp 2016, registered extension developers can claim their software by signing it digitally. This signature says, “I made this,” but in a secure coded format. In other words, when an extension is signed, the extension file contains a signature file that is securely tied to the developer’s Extension Warehouse account. An extension may be unsigned if you installed it manually.
Tip: Download the most recent version of any extension you use from the Extension Warehouse, the author, or the original trusted download source. You might contact the author of any extensions that are not digitally signed and ask them to look into this new feature.
The Extension Manager enables you to see whether an extension is signed. If you have an unsigned extension, you can tell SketchUp whether you trust the file, which determines whether the extension can be enabled at startup. Follow these steps:
- Select Extensions > Extension Manager. The Extension Manager window appears.
- In the Extension Name column, you see whether an extension is signed. Click the right-pointing arrow to see an extension’s details, and you can view the extension’s signature information and designate an unsigned signature as trusted.
Understanding what you need
To start using SketchUp for Web, you need the following:
-
A Trimble ID or Google Account for signing in: SketchUp for Web is a web-based SaaS product (software as a service) that needs to know who you are so that you can create 3D models in a personalized work environment.
Tip: Signing in also gives you access to Trimble Connect, a service that enables you to collaborate and share and view 3D models. When you sign in to SketchUp for Web with a Trimble or Google ID, Trimble Connect gives you 10GB of free online storage. Trimble Connect also helps you keep work up to date across our desktop, web, mobile, and XR software. To learn more about Trimble Connect, visit the Trimble Connect home page. - An internet connection: Because SketchUp for Web is web-based, you must be online to use it. We recommend a reliable internet connection with at least 10 Mbps download and upload speeds.
- A recommended web browser: SketchUp for Web depends on WebAssembly, a new technology that requires cutting-edge browser support. For the best experience, we recommend Chrome 59+, Firefox 52+ or Microsoft Edge 84+. Although SketchUp for Web will work in Safari, we cannot confidently recommend this browser at the time of this writing.
- A computer or Chromebook: SketchUp for Web works best on devices that have an accelerated video card, plenty of system memory, and a strong processor that can handle complex models with lots of geometry. Because SketchUp for Web is web-based, you can use it with a recommended browser on a Linux computer or Chromebook. (SketchUp Pro works only on Microsoft Windows and Mac OS X.) See the Hardware Requirements for more information.
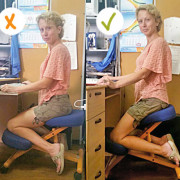
Tip: SketchUp is best-suited for mouse and keyboard interaction.
We recommend using a three-button , scroll-wheel mouse for easy orbiting, zooming, and precision positioning while modeling.
Пропорциональное масштабирование выборки
Если вы хотите изменить размер геометрии в модели и сохранить ее пропорции, вы можете использовать инструмент «Рулетка» или инструмент «Масштаб». Выбор зависит от того, как вы хотите установить масштаб:
- Чтобы масштабировать размер определенной линии, используйте рулетку. Например, вы обнаружите, что одна комната на плане этажа может иметь ширину не более 10 футов, но остальная часть плана этажа может оставаться такой же. Или вы знаете, что статуя должна быть 3 метра в высоту.
- Чтобы изменить размер выделенной области в процентах от исходного размера, используйте инструмент «Масштаб». Например, выберите этот метод, если вы хотите увеличить размер выборки на 200% или уменьшить его до 50%.
Чтобы масштабировать часть вашей модели с помощью рулетки, выполните следующие действия:
- С помощью инструмента Выбрать () выберите объекты, которые нужно масштабировать.
- Щелкните выборку и в появившемся контекстном меню выберите Создать группу.
- Дважды щелкните группу. Вокруг группы появится рамка из пунктирных линий, указывающая, что вы открыли группу, как показано на рисунке.
- Выберите инструмент Рулетка () или нажмите клавишу T.
- Щелкните одну конечную точку контрольной линии. Используйте механизм вывода SketchUp, чтобы выбрать точную конечную точку.
- Щелкните другую конечную точку контрольной линии. Текущее расстояние отображается в поле «Измерения», как показано на рисунке. В этом примере, скажем, вам нужно уменьшить эту ширину до 10 футов из-за проблем на участке, где будет построен план этажа.
- Введите новый размер линии (в этом примере вы вводите 10′) и нажмите клавишу Enter. Этот размер будет использоваться в качестве основы для пропорционального масштабирования вашей модели. SketchUp спросит, хотите ли вы изменить размер группы или компонента.
- Нажмите кнопку Да, и ваша выборка изменится пропорционально. Посмотрите результат на следующем рисунке. Это комната намного меньше.
Примечание. Этот процесс также работает с компонентами. См. Добавление готовых компонентов и динамических компонентов для ознакомления с компонентами. В разделе далее в этой статье объясняется, как масштабирование влияет только на один компонент или все экземпляры компонентов в модели.
Если вы хотите пропорционально масштабировать модель в процентах, инструмент «Масштаб» легко справится с этой задачей. Представьте, что вы не знаете, как поговорить со своим клиентом об уменьшении комнаты на его плане этажа до 10 футов шириной, поэтому вы моделируете слона в комнате, пока обдумываете это. Вот как масштабировать слона или любую другую выборку в вашей модели в процентах:
- С помощью инструмента Выбрать () выберите геометрию, которую нужно масштабировать. Этот шаг важен, если вы хотите масштабировать сложную 3D-выборку. Если у вас простая выборка, например 2D-фигура или объект поверхности, вы можете пропустить этот шаг.
- Выберите инструмент Масштаб () или нажмите клавишу S. Вокруг вашего выбора появится желтая рамка с зелеными ручками, как показано на рисунке. Если вы пропустили шаг 1, щелкните геометрию курсором инструмента «Масштаб».
- Для равномерного масштабирования или сохранения пропорций выборки щелкните угловую ручку масштабирования. Выбранная ручка и противоположная ручка масштабирования становятся красными, как показано на следующем рисунке, а в поле «Измерения» вы видите масштаб 1.00, что означает, что ваша геометрия имеет исходный размер или масштабируется до 100%.
- Переместите курсор, чтобы масштабировать объект. В поле «Измерения» масштаб отображается динамически. Чтобы начать все заново, в любой момент нажмите клавишу Esc. Чтобы установить масштаб из центра, а не из противоположного угла, удерживайте клавишу Ctrl (Windows) или клавишу Option (macOS), перемещая красную ручку угла.
-
Щелкните, чтобы установить новый масштаб вашей выборки. Или введите желаемые размеры шкалы и нажмите Enter.
Примечание. Технически на шаге 5 вы можете ввести размер, например 2 м или 3″, вместо размера в масштабе. Однако масштабирование на основе измерения с помощью рулетки, как правило, более интуитивно понятно.
В заключении
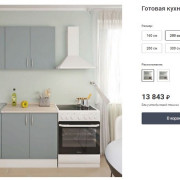
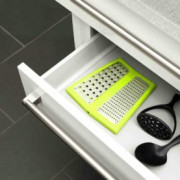
Проектирование и сборка мебели самому — это экономия денег где-то в 2 раза. А также возможность втиснуть ваше индивидуальное мебельное изделие в любую нестандартную дырку в квартире. Я обычно собираю мебель на конфирматах 7×50 из ЛДСП 16 мм
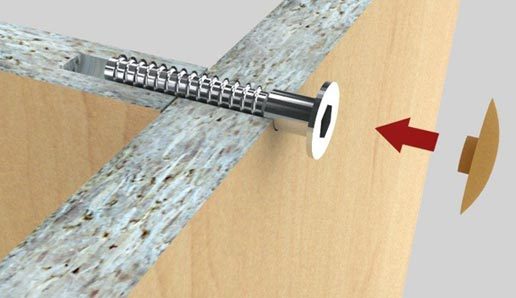
При наличии сверла для конфирматов
(и небольшого навыка) сборка занимает не так много времени.
Единственный минус — в это можно втянуться. После рабочего стола я уже собрал: кухню, несколько клеток (для одной и той же птицы она на фото), полки (навесные и напольные), тумбы и столы. В общем «захламил» в квартире все неиспользуемые места.
Ссылка на страницу плагина
Особенности
Несмотря на то, что приложение SketchUp позиционируется как полупрофессиональное и для любительского использования, программа имеет ряд особенностей, которые могут рассматриваться как преимущества.
Кроме того, существующие в программе возможности позволяют успешно использовать ее и для более профессиональных нужд, а именно: проектирования, моделирования, создания 3D объектов и 2D эскизов, чертежей. Дополнительно осуществляя их реалистичную визуализацию.
Отличительные черты SketchUp от других редакторов:
- Наличие инструмента «Push/Pull» для удобного вытягивания плоскостей в нужную сторону. Походу чего будут появляться дополнительные боковые стенки.
- Специальный инструмент «Follow Me» для более комфортного проектирования стен и движения плоскостей по заранее заданной кривой.
- Поддержка дополнительных плагинов и макросов на Ruby. Использовать можно уже готовые или создавать новые прямо в программе.
- Поддержка создания новых элементов, которые затем можно сохранить для многократного использования и редактирования.
- Встроенная библиотека моделей и стилей, которые можно загрузить в программу напрямую, через Интернет.
- Поддержка анимации и работы со сценами, анимированными переходами.
Помимо огромного количества встроенных компонентов, программа поддерживает работу с внешними плагинами, которые можно загрузить через Интернет. Для этого достаточно воспользоваться встроенной в приложение библиотекой.
Здесь же вы найдете огромное количество уже готовых моделей предметов мебели, архитектурных зданий и т.д. Поэтому вы сможете быстро проектировать здания, обставляя интерьер уже готовыми 3D моделями. Вы также можете поделиться собственными моделями с другими пользователями. На нашем сайте вы можете установить себе кряк версии данного софта, безопасно и без вирусов.
Scaling your entire model
When you want to scale your entire model, use the Tape Measure tool.
Tip: The Tape Measure tool enables you to scale precisely by specifying the desired dimension between two points. This line is referred to as the reference line.
To scale an entire model, such as the floor plan in this example, follow these steps:
- Select the Tape Measure tool () or press the T key. The cursor changes to a tape measure.
- Measure the distance between two points on your model. In this example, say you know the width of the stairs needs to be 48 inches. Here’s how to measure that distance:
- Click one end of a line segment to set the starting point of a measurement. Use the SketchUp inference engine to make sure you click the exact point.
- Move the mouse to the end point of the same line segment. As you move the mouse, a temporary measuring tape line, with arrows at each end, stretches out from your starting point.
- Click at the other end of the line segment, as shown in the figure. The final distance appears in the Measurements box.
- Type a new size for the line, which appears in the Measurements box, and press Enter. This size is the basis for a proportional rescale of your model. In this example, the reference line is scaled to 48”.
Tip: You can use imperial or metric units. SketchUp understands both. Just be sure to specify your desired unit if it’s not your template’s default unit of measurement. - When the following dialog box asks whether you want to resize your model, click the Yes button, and the model is rescaled proportionally.
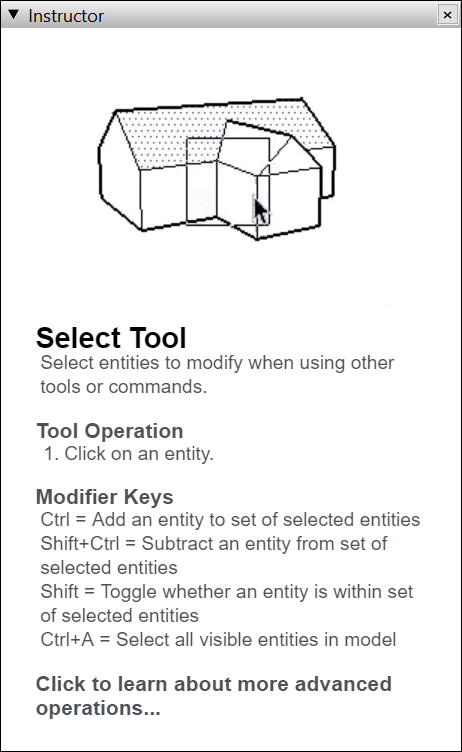
Learning how to use SketchUp tools
As you use SketchUp, the Instructor and the status bar give you pointers on using each tool.
The Instructor teaches you how to use the currently selected tool. To turn on the Instructor, shown here, select Window > Instructor, or click the question mark icon in the status bar. Here’s what the Instructor has to offer:
The Instructor teaches you how to use the currently selected tool. To turn on the Instructor, shown here, select Window > Instructor, which you find in the Default Tray. Here’s what the Instructor has to offer:
The Instructor teaches you how to use the currently selected tool. To turn on the Instructor, shown here, select Window > Instructor. Here’s what the Instructor has to offer:
- An animation that shows basic use of the selected tool
- A description of what the tool does
- Steps for using the tool, which correspond to the animation
- Modifier keys that enable the tool perform additional functions
- A link to Help Center articles about advanced functions of the tool
If the Instructor offers more detail that you need, remember that the status bar also offers tips on using the selected tool. See the section earlier in this article for details.
LayOut
Компонент LayOut позволяет осуществлять оформление конструкторской документации на основе моделей, которые были созданы в программе SketchUp.
Сразу после запуска программа предлагает выбрать шаблон для дальнейшей работы. Для этого доступно несколько основных форматов: А3 и А4, книжная или альбомная ориентация листа.
Дополнительно можно указать тип бумаги: разлинованную (со вспомогательными линиями) или обычную, белую (в дальнейшем фон заливки можно будет изменить).
- Меню, расположенное в верхней части экрана.
- Рабочая область, расположенная по центру.
- Панели инструментов, расположенные вокруг рабочей области.
- Лоток по умолчанию, расположенный в правой части экрана.
Меню
В самой верхней части программы располагается Меню, которое позволяет получить быстрый доступ к основным функциям программы.
Оно состоит из таких пунктов, как:
- Файл. Для осуществления простейших операций с документами. Позволяет открывать, сохранять и загружать 3D модели. Здесь же, в меню «Настройки страницы» можно изменить тип и формат бумаги, изменить ориентацию листа на книжную или альбомную.
- Изменить. Для быстрого доступа к операциям для редактирования текущего документа. Включает такие операции, как отменить, вернуть, копировать, вставить. Здесь же находится меню «Параметры приложения», где можно настроить редактор изображений, текста и таблиц по умолчанию, изменить или добавить горячие клавиши для быстрого доступа к нужным компонентам программы. Выбрать настройки для запуска.
- Вид. Позволяет изменять масштаб рабочей области, активировать сетку, включать режим панорамы, использовать символы предупреждения.
- Текст. Для работы с надписями. Можно менять формат текста (курсив, полужирный, подчеркнутый, зачеркнутый). Осуществлять выравнивание, менять межстрочный интервал.
- Упорядочить. Для удобной работы со слоями. Здесь же можно включить или выключить привязку объектов к сетке.
- Инструменты. Перечень доступных для работы с файлом инструментов.
- Страницы. Позволяет удалять или добавлять страницы, перемещаться между уже созданными.
- Окно. Для управления элементами, находящимися в меню «Лоток по умолчанию», расположенном в правой части экрана.
- Справка. Для быстрого доступа к справочной информации.
Лоток по умолчанию
Панель инструментов, расположенная под «Меню» включает в себя основные для редактирования компоненты. При необходимости ее можно удалить или переместить в другое место на экране.
Лоток по умолчанию помогает быстро настраивать рабочую область, поменять цвет фона, толщину линий и другие необходимые параметры.
По умолчанию включает в себя:
- Цвета. Доступен выбор необходимого оттенка при помощи пипетки, используя схемы RGB, HSB, Оттенки серого, Изображение, Список. Здесь же можно настроить прозрачность альфа канала. Сохранить несколько цветов в палитру.
- Стиль фигуры. Можно выбрать заливку для фигуры, тип, цвет и толщину линий. Настроить стиль штриха.
- Заливка шаблоном. Для выбора доступны тональные заливки, символы материалов, геометрические плитки и шаблоны сайтов.
- Модель SketchUp. Для удобной работы с моделями, которые были созданы в программе SketchUp. Позволяет осуществлять визуализацию объектов.
- Стиль текста. Работа со шрифтами. Можно настроить выравнивание, межстрочный интервал, размер и тип шрифта.
- Страницы. Для создания и редактирования страниц, перемещения между ними.
- Слои. Для перемещения между слоями проекта. Можно настраивать их видимость, закреплять (защита от изменения) выбранные.
- Вырезки. Для более подробной визуализации документа. Включает в себя всевозможные стрелки и указатели, которые можно удобно размещать.
- Учебник. Краткая справка и помощь, касательно выбранного элемента. Информация будет меняться в зависимости от того, какой инструмент выбран.
При необходимости панель инструментов и меню Лоток по умолчанию можно закрыть. Благодаря этому можно значительно увеличить размер рабочей области. Вновь вернуть закрытые вкладки можно через пункт меню «Окно».